
Documentation Index

Fetch the complete documentation index at: https://growthbook-preview.mintlify.app/llms.txt

Use this file to discover all available pages before exploring further.

This guide walks through how to add GrowthBook feature flags to an Express.js application. It assumes you are starting from scratch, so if you already have an Express.js application, you can skip to step 2.

1. Create an Express.js app

First, install Express.js
  • npm
  • Yarn
  • pnpm
  • Bun
npm install express
yarn add express
pnpm add express
bun add express
Then, create an index.js file with a simple hello world route
const express = require('express')  
const app = express()  

app.get('/', (req, res) => {  
  res.send('Hello World!')  
})  

// Listen on port 3000  
const port = 3000  
app.listen(port, () => {  
  console.log(`Example app listening on port ${port}`)  
})
Finally, run the app with:
node index.js
Visit http://localhost:3000 and you should see a “Hello World!” response!

2. Create a GrowthBook Account

GrowthBook can be self-hosted, but for simplicity, we will use GrowthBook Cloud in this guide, which is free for simple projects like this. Go to app.growthbook.io and create a new account if you don’t have one yet. Once you are logged in, create an SDK Connection and select Node.js as the language. This will generate a unique Client Key for you. Keep note of this key as we will use it in the next step.

3. Integrate the GrowthBook JavaScript SDK into the Express.js app

Create the file .env if it doesn’t exist yet and add the generated key there:
GROWTHBOOK_API_HOST=https://cdn.growthbook.io  
GROWTHBOOK_CLIENT_KEY=
Now let’s install the GrowthBook JavaScript SDK
  • npm
  • Yarn
  • pnpm
  • Bun
npm install @growthbook/growthbook
yarn add @growthbook/growthbook
pnpm add @growthbook/growthbook
bun add @growthbook/growthbook
Lets now modify the top of index.js file and create a GrowthBookClient instance:
const express = require('express')  
const app = express()  
const { GrowthBookClient } = require("@growthbook/growthbook")  

// GrowthBookClient instance  
const client = new GrowthBookClient({  
  apiHost: process.env.GROWTHBOOK_API_HOST,  
  clientKey: process.env.GROWTHBOOK_CLIENT_KEY  
});  

// Initialize it  
client.init().then((status) => {  
  console.log("GrowthBook initialized", status);  
});
Lets also add a middleware to index.js that creates a user-scoped instance for every request. Make sure to place this above the route handlers:
app.use((req, res, next) => {  
  // Attributes about the current user/request  
  const userContext = {  
    attributes: {  
      // In a real app this would come from a cookie or session  
      // We would also add more attributes like country, etc  
      id: "123",  
    }  
  }  

  // Make this available to all subsequent route handlers  
  req.growthbook = client.createScopedInstance(userContext);  
  next();  
});
Lets re-start the Node process and make sure you see the “GrowthBook initialized” message in the console and the status is successful. Since we are using a .env file, we need to modify the command to tell Node.js to load it.
node --env-file=.env index.js

4. Create a Feature in GrowthBook

Back in the GrowthBook application, we can create a new feature. For this tutorial, we’ll make a simple on/off feature flag that determines whether or not we show the message in Spanish.
GrowthBook Create Feature
The key we chose (spanish-greeting) is what we will reference when using the GrowthBook SDK. We can now edit the route in 
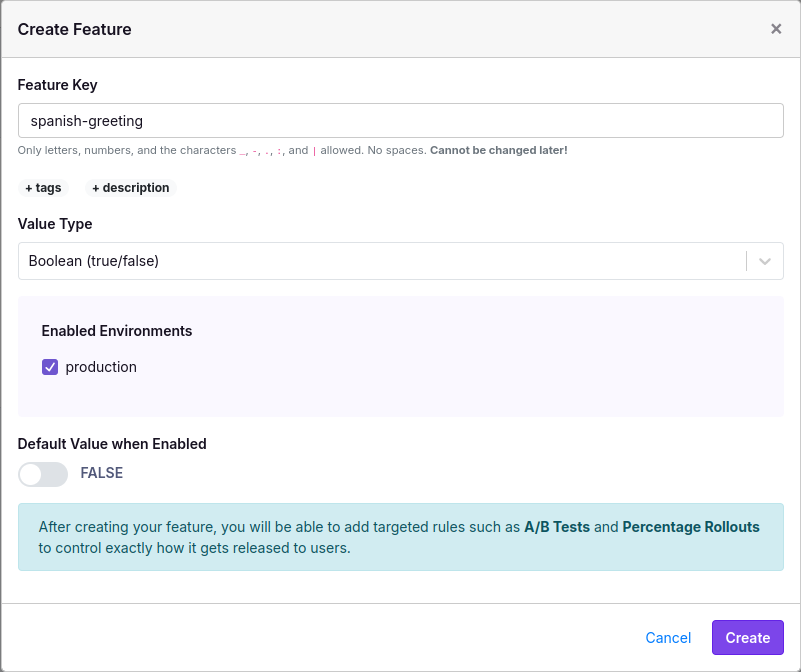
index.js to use this flag:
app.get('/', (req, res) => {  
  let message = "Hello World!";  

  if (req.growthbook.isOn("spanish-greeting")) {  
    message = "Hola Mundo!";  
  }  

  res.send(message);  
})
Now, if you restart the Node process and refresh the page in the browser, you will still see the original “Hello World!” because when we created the feature, we set it to be Off by default.

5. Target Specific Users

Now we can add rules to the feature to turn it on for specific users. In the userContext we added, we hard-coded an id of “123”. We can now use this id to create a rule in GrowthBook to turn on the feature for this user. On the feature page, click the “Add Rule” button and select “Force Value” as the rule type. Then add targeting by attribute and save the rule. It should look something like this:
GrowthBook Targeting Rule
Rules start out in a draft state in GrowthBook. You need to publish the draft to make it live. After publishing, restart the Node process once more and refresh the page. You should now see the message in Spanish. ¡Qué bueno! Try changing the id in 
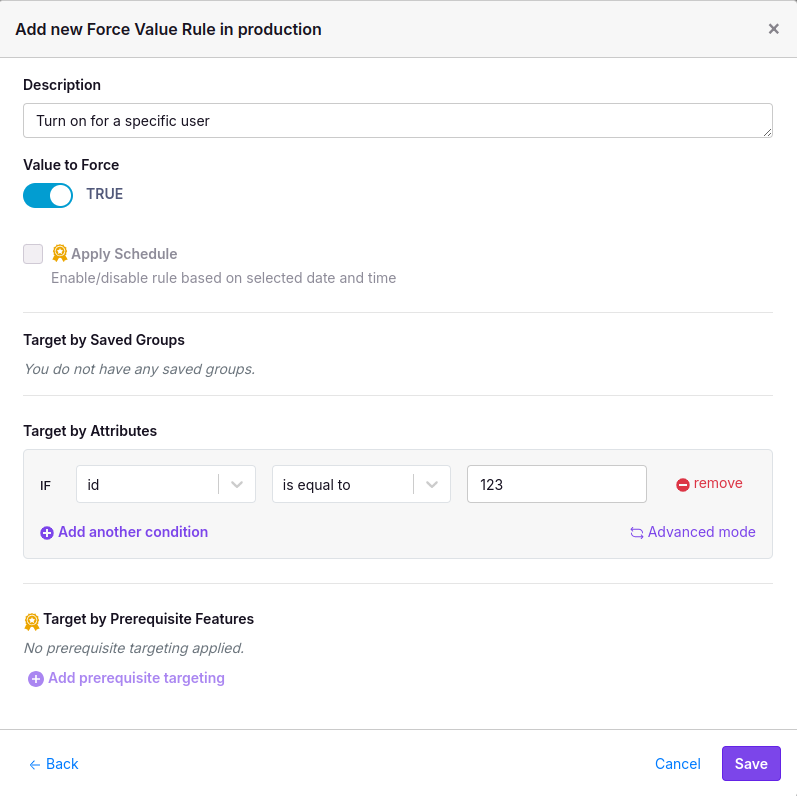
userContext to something else like 456, restart Node, and the response will now switch back to English.

Conclusion and Next Steps

In this tutorial, you learned how to use a simple feature flag in an Express app and target individual users. But this barely scratches the surface of what you can do with GrowthBook. Here are a few next steps you can take: View the full Node.js docs for more information on all of the options available in the GrowthBook SDK, including streaming updates, persistent caching, and more.